Showing posts with label recipe. Show all posts

Thursday, August 2, 2012

Pineapple & Habanero Sauce Knock-Off

I can not even tell you how excited I am to share this recipe with you today.  Recently we tried the Rothschild Farm Roasted Pineapple Habanero Sauce from Costco and it is amazing.  Looking at the ingredients, I knew it was something we could totally recreate.  And if you know Costco, just when you fall in love with something, they stop carrying it so I was totally on a mission.  (Note:  They still carry it, however it was so easy to make it doesn't matter.)


We LOVE Costco at our house and sometimes you can find the most amazing foods there that you can not find anywhere else (well, maybe online but I am not a big online shopper).

This sauce is absolutely amazing!  So far we have tried it on grilled chicken, pork chops, shrimp tacos, poured over a brick of cream cheese as a dip and straight up salsa with chips.  I swear, if you like sweet and spicy - this sauce is the bomb!


The bottle from Costco, while large (37 oz), is around $8.  Not a cheap condiment.  Looking at the ingredient list, I knew it was very doable.  There is absolutely nothing I wasn't familiar with so I headed to the store.  Grabbed my ingredients and set out to develop my recipe.  I don't have an exact breakdown of cost, but I am certain I spent no more than $8 and I was able to get over 4 pints of sauce.

Honestly, I thought it would take me a couple tries but it turned out amazing, right out the gate!  So here it is.


Pineapple Habanero Sauce

Ingredients:
4 cups sugar
1 cup apple cider vinegar
1 cup pineapple juice
3 Tbsp lemon juice
3 Tbsp cornstarch (mixed with a bit of water to create slurry)
1 medium to large pineapple, roasted, finely chopped
1 medium onion, finely chopped
1 red pepper, finely chopped
1 yellow pepper, finely chopped
1 mango, finely chopped
5-6 habanero peppers, roasted, finely chopped

Create a simple syrup in a large pot by whisking the sugar, vinegar, pineapple juice and lemon juice over medium high heat until the sugar dissolves. Turn up the heat and bring to a boil for 2 minutes.  Turn off the heat and let sit while you prep the remaining ingredients.


Roasting the pineapple and habaneros will bring out their inherent sweetness and richness.  This can be done on your grill outside or using a grill pan on your cook-top.  (I chose to use my George Foreman since it was pouring rain outside when I was working on this recipe.)  Slice the pineapple in rings and grill until the sugars begin to caramelize and creates grill marks on both sides.


Note:  Before finely chopping my pineapple I trimmed away the outer rind.

Lightly char the skins of the habanero peppers over an open flame or on a searing hot grill pan.  Do not grill your red and yellow bell peppers in order to maintain some crunch and texture in the sauce.


Make sure the habaneros are super finely chopped. If you want to tone down the heat slightly carefully remove the seeds.  (I used my chopper so that I would not have to touch the peppers - I have a habit of getting hot pepper oils on my fingers and touching my eyes.  The pepper oils not only make your hand tingle but burns like crazy on your face.  NOT FUN! Additionally, the chopper allowed me to make sure the peppers were in super tiny pieces so no one bites into a large piece of super hot pepper.)

Next, finely chop all fruit, peppers and onion into 1/4" pieces (or smaller).  Stir the remaining ingredients into the simple syrup you prepared earlier.  Stir in the cornstarch (mixing with a few tablespoons of water first to create a slurry).  Bring the mixture to a boil and the turn down the heat to simmer for 5-10 minutes.  The consistency should be syrupy and chunky.

This recipe makes 4-5 pints of sauce.  The sauce may be canned using a water bath for 15 minutes. Or placed in jars and frozen.  Sauce should remain fresh in the fridge for approximately 2-3 weeks (if it lasts that long).


As with the store bought sauce, it is the perfect pairing with so many things including chicken, pork, fish and seafood.  It makes a great appetizer when partnered with cream cheese or goat cheese and used as a dip or a topping on crackers or croutons.  We love it to just dip tortilla chips (alongside a margarita and life is good).


I am going to take a small jar and pour it over a few pieces of chicken in the crock pot for dinner tonight.

I just love the versatility of this sauce.  The sweetness is awesome when paired with the heat of the habanero.  Plus, the vinegar offers just enough tang to help cut some of the heat as well.

I hope you enjoy!

Linked up with:  House of Hepworths, Somewhat Simple, Chic on a Shoestring Decorating, The Frugal Girls, Nap Time Crafters, eighteen25, Tatertots and Jello, Funky Junk Interiors, I Heart Naptime, A Crafty Cook, Under the Table and Dreaming


Monday, January 16, 2012

Menu Monday & Chicken Nugget Knock-offs


Well, we are in week 3 of the new year and while I have been making a menu plan, I will admit we haven't been following it, exactly.  In general I have made the meals, just not necessarily on the days I "planned".  I guess I am still a bit of a "what am I hungry for" and "I don't feel like making that tonight" kind of cook.  That being said, I am going to stick with it and maybe it will click.  Planning definitely helps when I hit the grocery store.

Monday
Carnitas - I bought a big pork roast on sale at Costco yesterday.  Some of this will go in to the freezer for another day.

Tuesday
Eating @ In-Laws - I won't be home so the kids and hubby have been invited to my in-laws!  Awesome!

Wednesday
Soup - not sure what yet, maybe an Italian soup with sausage & spinach - I will have to let you know

Thursday
Cheeseburgers & Hashbrowns

Friday
Homemade Shrimp & Goat Cheese Pizza (kids will likely just have cheese pizza)

Saturday
Lunch:  Panini Sandwiches
Dinner:  Spaghetti & Meatballs

Sunday
Lunch:  birthday party
Dinner:  In-laws

I shared on Facebook last week that I made two recipes that I had pinned on Pinterest last week.  They both were awesome. 

The first was homemade caramel made by boiling a can of sweetened condensed milk.  Pretty straight forward and very yummy.  It is awesome for dipping apples.  The boy and I had it for lunch 2 days in a row.  Yum!!! 
The second recipe was for knock-off Chick-Fil-A Nuggets from My Name is Snickerdoodle.  These were absolutely wonderful.  Maybe not as good as the original but very tasty.  I did 2 versions of these.  The first night I followed the recipe and fried them.  They were very good although they tasted a bit like the oil.

On night 2 I made this baked version...


I really liked these and of course, they were healthier.  (I didn't get a picture of the fried ones, sorry, we were so excited to eat them that it slipped my mind.)

The real secret to the recipe is the addition of powdered sugar in the breading which gives it some sweetness.  I never thought about that the nuggets at Chick are sweet, but they kind of are and that is what makes them so tasty.  I made a few changes to the original recipe.  Since I was baking these, I added some additional sugar to help crisp up the nuggets under the broiler.  I also added some Tobasco and cayenne to give the nuggets a bit more flavor and zip.  So here is my recipe.

Sweet Baked Chicken Nuggets
2 skinless and boneless chicken breasts
1 cup milk
1 egg
1 tbsp Tobasco
1 cups flour
1/4 cup powdered sugar
1 tsp salt
1 tsp garlic salt
1 tsp pepper
1 tsp cayenne pepper

Trim away any fat from the chicken and cube them in to bite size pieces.  Try to keep them uniform in size so they cook evenly.  In a medium bowl whisk the egg and stir in the milk and Tobasco.  Place chicken in milk mixture and cover. Let it 'marinate' for 2-4 hours in the fridge (I let mine sit overnight since I made them 2 days in a row). This will make the chicken very nice and tender. Combine your dry ingredients in a bowl or large resealable bag.  Add your "marinated" chicken to the dry ingredients and coat.  Spread the chicken out on a large baking sheet, leaving space between.  Place the pan under the broiler.  Watch closely.  When the nuggets start to get a bit golden brown, remove the pan and turn over the chicken using tongs.  Place back under the broiler to brown the other side.  Under the broiler, the heat somewhat carelizes the sugar in the breading which allows the nuggets to turn a golden brown and get a bit of a crunchy crust.

Serve with your favorite dip and enjoy.


Wednesday, December 14, 2011

Dessert Shooters

Last night we hosted a small Christmas party at our house for one of my husband's business groups.  I made an awesome machaca with fresh tortillas and all the fixings.  Machaca is a spicy shredded beef that is popular at nearly every Mexican restaurant here in Arizona.  It is by far one of my favorite foods!  One of these days I will share my recipe, but today, I am here to talk dessert.

Last summer I was wasting time perusing Pinterest and came across a number of photos of dessert shooters - decadent desserts, served in shot glasses.  These mini dessert delights give you a small taste of a yummy dessert.  Generally, you would serve several different varieties which would give your guests a small taste of several yummy treats.  Think about it, how often are you at a party or event and feel you have to choose between the cheesecake, pie, cake, etc. because there is no way you could eat an entire piece of more than one?

I spotted some nice, clear plastic disposable shot glasses at The Dollar Tree and new immediately that we would be serving dessert shooters sometime soon.  Well, last night was the night.  Since this was going to be a small group, I decided on doing two simple mousse desserts!  Mmmmmmm!


A dessert shooter is really just a method of serving a dessert.  Feasibly, most any dessert can be presented in a small cup.  You can layer pie, shortcake, pudding, fillings, etc. for a fun and unique presentation.  I decided to keep my first attempt somewhat simple with a couple of mousse desserts.  Besides, the dark chocolate mousse recipe has got to be one of my favorites - amazingly delicious and simple.  I partnered it with another classic holiday flavor - a pumpkin cheesecake mousse.


A friend of mine shared this delicious dark chocolate mousse recipe with me last Christmas when I was looking for a light, but decadent dessert to pare with our holiday feast! These small bites were perfect - although, I will admit, I ate several.  Two bites is just not enough!

Dark Chocolate Mousse

5 1/4 ounces bittersweet chocolate, coarsely chopped
14 ounces heavy cream
3 large egg whites
1 ounce sugar
sweetened whipped cream, for garnish (optional)
shaved bittersweet chocolate, for garnish (optional)

Place chocolate in a large bowl set over a Bain-marie or in a double boiler at a low simmer.  Stir chocolate until melted.  Turn off the heat and let stand.

Beat the cream until it forms soft peaks.  Set aside.  With a clean mixer, whip egg whites to soft peaks.  Gradually add the sugar and continued whipping until firm.

Remove the chocolate from the Bain-marie and using a whisk, fold in the egg whites all at once.  When the whites are almost completely incorporated, fold in the whipped cream.  Cover the mousse and refrigerate for approximately 1 hour or until set.**  Serve in goblets topped with more whipped cream and shaved chocolate if desired.

** I skipped this step of letting the mousse set up.  Using a piping bag, I filled my individual shot glasses with the mousse and then refrigerated.  Just prior to serving, I piped on some sweetened whipped cream and shaved a little chocolate on top.


I was serving a variety of chocolate candies and treats so I knew I wanted a non-chocolate dessert to provide some variety.  Since pumpkin pie is a classic holiday dessert I offered a twist using these flavors with a pumpkin cheesecake mousse.  I did a Google search and came across a few different recipes but ended up modifying this no-bake pumpkin cheesecake recipe from Kraft Foods and Philadelphia cream cheese.  Here is my version:

Pumpkin Cheesecake Mousse

1 package (8 ounces) cream cheese, softened
1 can (14 ounces) pumpkin puree
1/2 cup sugar
1/2 teaspoon pumpkin pie spice
14 ounces heavy cream, whipped to soft peaks
Sweetened whipped cream, for garnish (optional)
Fresh grated nutmeg, for garnish (optional)

Beat cream cheese, pumpkin, sugar and pumpkin pie spice with electric mixer on medium speed until well blended.  Gently fold in the whipped cream.  Refrigerate until set, 2-3 hours.  Serve in goblets topped with whipped cream and nutmeg, if desired.**


** Like the chocolate mousse, I skipped this step and placed the mousse in a piping bag to fill my shot glasses and then refrigerated until set.  Just prior to serving, I topped them with whipped cream and grated nutmeg.


*** While this recipe was good, I will try blending the pumpkin, spice and an egg or two over low heat to help develop the pumpkin flavor and offer a richer texture.  The pumpkin tasted "raw", unlike the pumpkin pie flavor I was hoping to achieve.  Let me know if you try this and what you think.


 The dessert shooters where a huge hit and will most definitely be served again.  While I used disposable shot glasses, I did try to salvage as many as I could and washed them up to use again.  I may have to keep my eye open for a bunch of shot or cordial glasses in the future.  I know I have seen a variety of sets of cordial glasses at the thrift store.


If you are looking to serve these at a party, I would plan for your guests to have 3-4 desserts (or one of each kind, depending on how many varieties you are serving) each.  


Also, depending on the glasses you are using, you may need to find some small demitasse spoons so that you can get all of the dessert out of the cup.  My cups were wide enough that I was able to use a teaspoon for my desserts (I used plastic).  If regular spoons would not have worked, I was planning to hit the party store or restaurant supply to find a small sample spoon much like you find at ice cream shops.


This was such a fun dessert for a fun event.  I look forward to trying other dessert shooters in the future.  Truly, the options are endless.


Wednesday, August 3, 2011

Lemon Buddies ... YUMMY!!!

Ever since I saw Lemon Buddies earlier this year I have wanted to try them.  I love the chocolate peanut butter version and I love lemon so I knew it would be a huge success. 


Well, I finally decided to give them a try for our trip.  Here is the actual recipe, as provided on the Chex website.  Only problem was, I did not have vanilla chips and I didn't have a lemon for the zest.  So of course, I improvised - a trait I have learned from my Mom who has always used a recipe as a guide!  {love you mom}
I substituted a bag of yellow vanilla candy melts for the vanilla chips and lime zest in place of the lemon zest.  I used some bottled lemon juice as well as some lemon extract as well.  My other alteration was I used the entire box of Rice Chex as it was only slightly more than the 9 cups.

They were yummy!  Can't wait to snack on them in the car on our way to California!


Thursday, April 21, 2011

Easter Tradition: Orange Bow Rolls


Easter is Sunday and my sister is coming to celebrate with us!  It is going to be sooo much fun!  What is it about holidays that brings back memories from our childhoods?  Some of my favorite memories are the foods that I now associate with certain holidays.  For instance, cut up oranges and grapefruit reminds me of Christmas.  We would eat this simple fruit salad (sprinkled with sugar) served in these disposable plastic Christmas cups with a holly print on them -- my Mom would make us wash them after each breakfast and we litterally reused these SAME cups every year for YEARS!  (She was an environmentalist before being earth concious was cool for sure!)

Another fond holiday memory is Orange Bow Rolls on Easter.  These yummy, fruity rolls remind me of spring.  I especially love pulling out the handwritten family cookbook that my Mom gave me when I went off to college!  The cookbook has since been typed (on an old school typewriter no less) with many additional recipes added, but the original, with my Mom's own handwriting is a treasure for sure.  This recipe, from my Grandmother Haupert is a treasure too!  I love these rolls and just had to share.


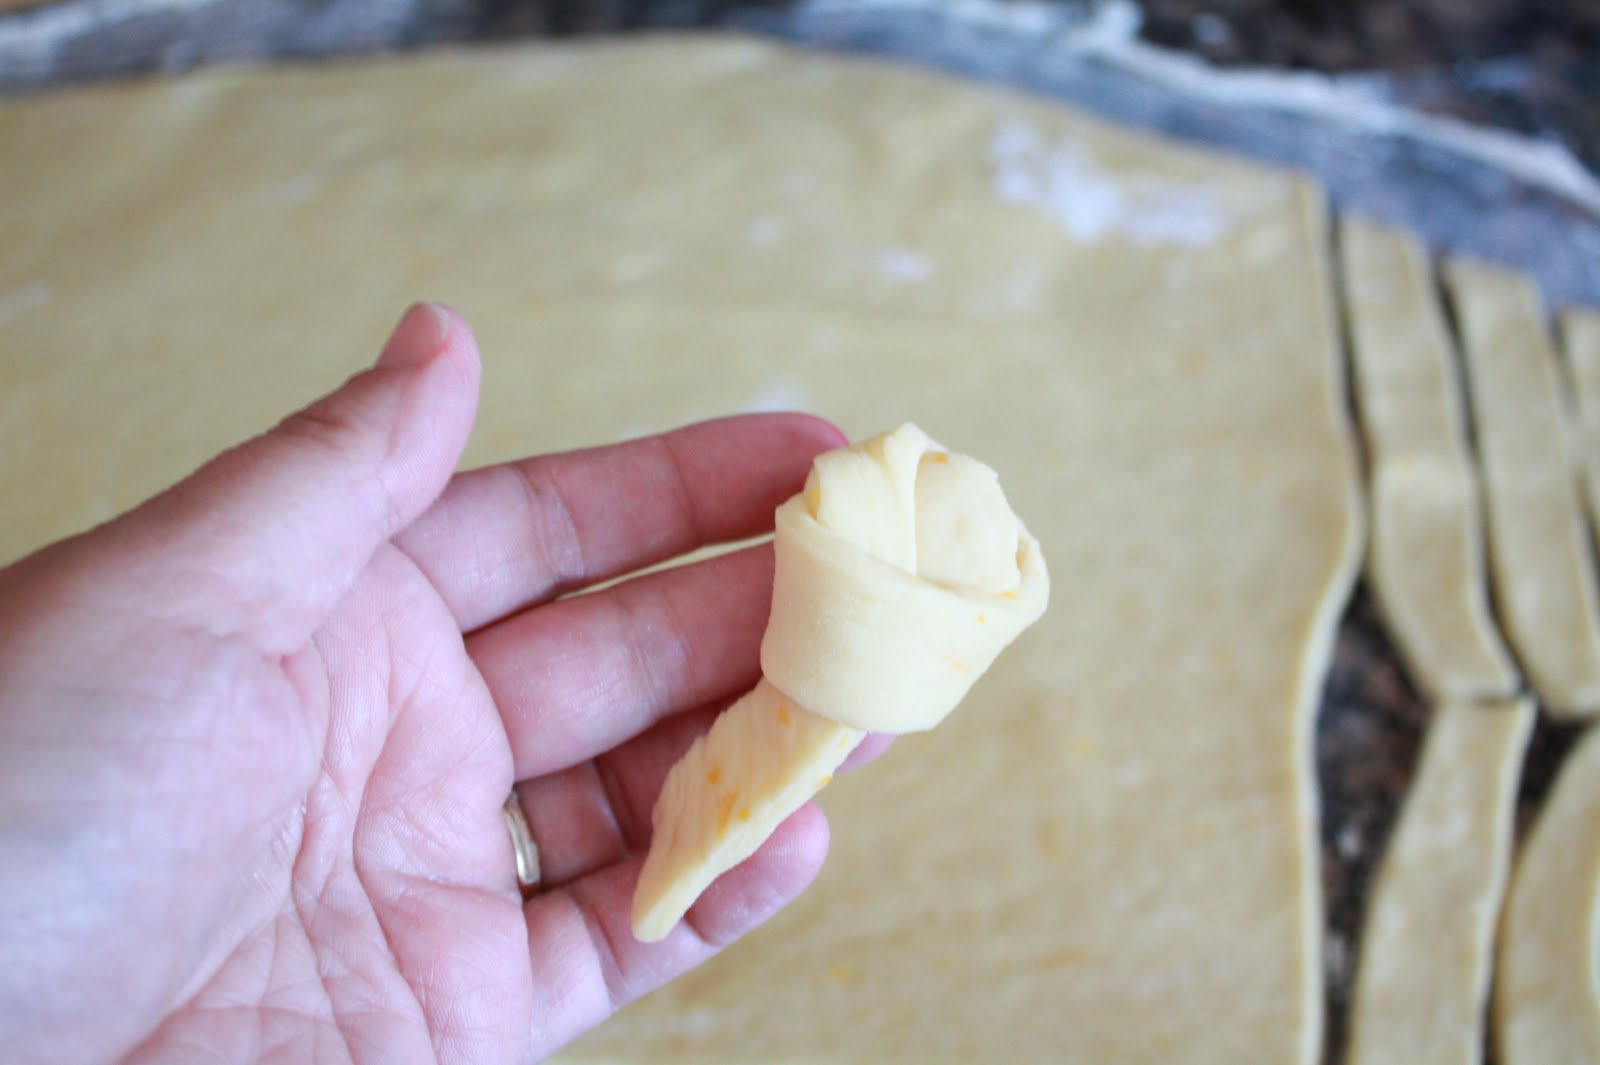
I have only made these a few times by myself, as I have to admit, they kind of intimidated me.  However, this time it went really well so maybe I don't have anything to be afraid of afterall.  The scary part was always tying the knot.  So here is a simple picture tutorial. 

NOTE:  I cut my pieces a bit shorter than the recipe calls for and stretched them a bit as I tied them.  It made a slightly smaller roll but I kind of like them.


Cut strips

Fold over

Tuck end thru opening

Pull thru to form not

Lay gently on greased baking sheet

KITCHEN TIP 
EVERY kitchen needs a microplane - this handy, super sharp tool once only found in your tool box is awesome for zesting citrus in a jif!


HAPPY EASTER EVERYONE!!!!

ORANGE BOW ROLLS
Combine:
1 1/4 cup scalded milk (Here is a great video for how to do this)
1/2 cup shortening
1/3 cup sugar
2 tsp salt

Cool mixture and add:
1 package yeast
2 eggs, beaten
1/4 cup orange juice
4-5 cups flour
2 Tbsp orange zest

Mix to soft dough.  Cover.  Let rest 10 minutes.  Knead.  Let rise until doubled.  punch down.  Roll to approximately 1/2" thick.  cut into 1/2" x 10" strips.  Tie in knots and put on greased baking sheets.  let rise until doubled. 

Bake at 375 degrees for 15 minutes.

Orange Frosting Glaze
2 Tbsp orange juice
1 tsp orange zest
1 cup powdered sugar

Frost while still warm to form a glaze on the rolls.

Linked up with...The CSI Project